Only with an electronic hoist limit switch
The switching points of the electronic hoist limit switch can be set without opening the chain hoist. This requires the supplied teach-in module or a pendant control with teach-in button, or an ABURemote AC receiver with teach-in.
The switching points do not need to be reset if the chain and chain sprocket are replaced. If the chain and chain sprocket are replaced, only the reference point needs to be reset. See page 42.
Overrunning the previous switching point
If the new upper or lower switching point is in an area that cannot be approached due to the previous switching point, the previous switching point must first be overrun.
To overrun a switching point:
 Move to the previous switching
point until the load hook stops.
─ Only with teach-in module: Remove the pendant control, plug in the teach-in module, wait 5 seconds, then remove the teach-in module and insert the pendant control.
Only with pendant control with teach-in button: Press teach-in button for 5 seconds.
Only with ABURemote AC with teach-in: Press “teach-in” direct access button (T with arrow) for 5 seconds.
 Raise or lower the load hook
over the previous switching point.
● The previous switching point has been overrun.
Setting the upper switching point
|
Overview of setting the upper switching point: (Described in detail below) ─ Move to the new switching point. ─ The last movement command before teach-in must be the “Lift” button. ─ Only with teach-in module: Remove the pendant control, plug in the teach-in module, wait 5 seconds, then remove the teach-in module and insert the pendant control. Only with pendant control with teach-in button: Press teach-in button for 5 seconds. Only with ABURemote AC with teach-in: Press “teach-in” direct access button (T with arrow) for 5 seconds.
|
Moving to the upper switching point:
 Raise the load hook to the
desired switching point.
─ Bottom block or hook assembly must not come into contact with the housing.
─ The friction clutch must not be triggered.
─ The new switching point must not be too close (about 10 cm) to a previous switching point. If it is too close, the following sequence is interpreted as the “Overrun previous switching point” function.
If a new switching point is to be set within this range, a switching point further away must first be temporarily set and only then the switching point at the desired hook position set.
─ The switching point cannot be above the reference point because the load hook cannot be moved up beyond the reference point.
Normally, this situation should not occur because the reference point is usually programmed to be at the highest hook position (bottom block or hook assembly just below the housing) and therefore the load hook cannot move any higher.
 Finally, briefly press the
“Lift” button.
Before teach-in, the “Lift” button must be pressed last if the upper switching point is to be set.
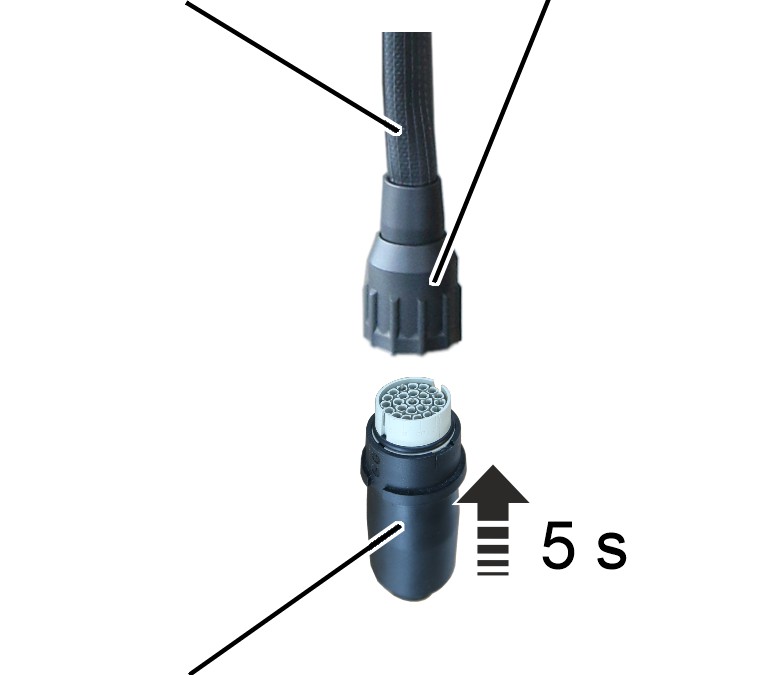
Inserting the teach-in module
|
Control cable |
Bayonet nut |
|
| |
|
Teach-in module |
|
 Remove the pendant control.
 Insert the teach-in module.
 Wait at least 5 s.
 Remove the teach-in module.
 Only with pendant control with
teach-in button: Instead of inserting the teach-in module, press and hold the
teach-in button for 5 seconds.
 Only with ABURemote AC with
teach-in: Instead of inserting the teach-in module, press and hold the
“teach-in” direct access button (T with arrow) for 5 seconds.
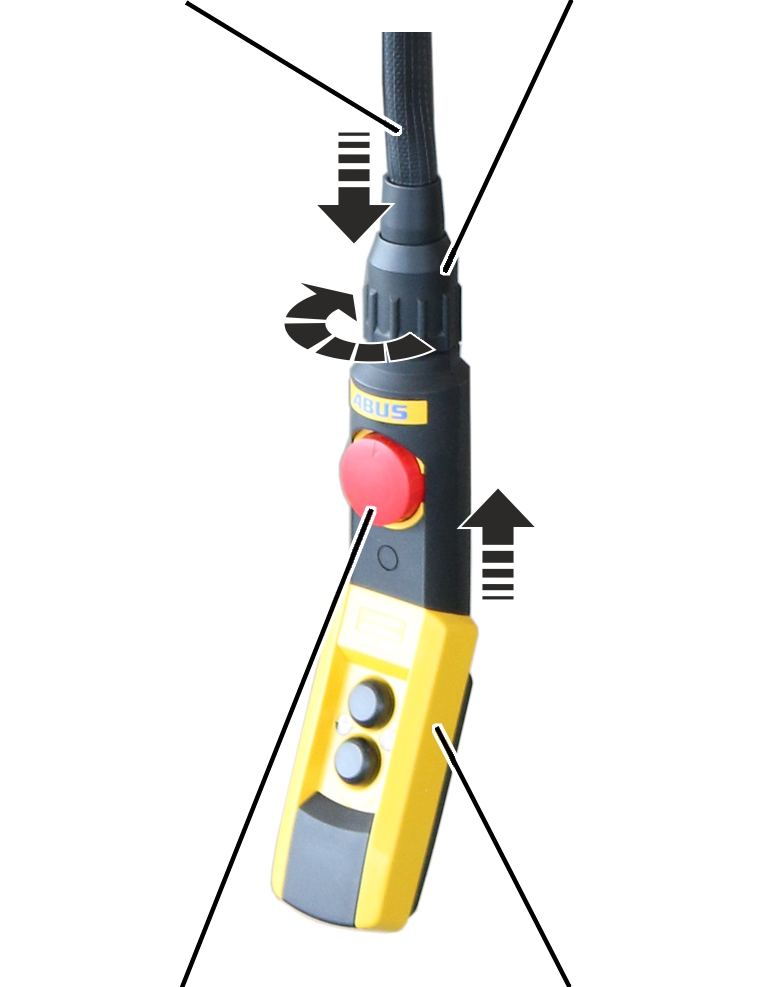
Inserting the pendant control
|
Control cable |
Bayonet coupling |
|
| |
|
Emergency stop button |
Pendant control |
 Only with teach-in module:
Insert pendant control.
 Only with teach-in module:
Unlock emergency stop button.
● The upper switching point is saved.
Setting the lower switching point
|
Overview of setting the lower switching point: (Described in detail below) ─ Move to the new switching point. ─ The last movement command before teach-in must be the “Lower” button. ─ Only with teach-in module: Remove the pendant control, plug in the teach-in module, wait 5 seconds, then remove the teach-in module and insert the pendant control. Only with pendant control with teach-in button: Press teach-in button for 5 seconds. Only with ABURemote AC with teach-in: Press “teach-in” direct access button (T with arrow) for 5 seconds.
|
Moving to the lower switching point:
 Lower the load hook to the
desired switching point.
─ The load hook must not come into contact with the floor of building.
─ The chain must not be slack.
─ The C-link in the chain box must not come into contact with the housing.
This would trigger the friction clutch and then damage it in regular movement.
─ The hook path (distance between the highest hook position and the lowest hook position) must not be greater than specified on the type plate.
─ The new switching point must not be too close (about 10 cm) to a previous switching point. If it is too close, the following sequence is interpreted as the “Overrun previous switching point” function.
If a new switching point is to be set within this range, a switching point further away must first be temporarily set and only then the switching point at the desired hook position set.
 Finally, briefly press the
“Lower” button.
 Before teach-in, the “Lower”
button must be pressed last if the lower switching point is to be set.
Inserting the teach-in module
|
Control cable |
Bayonet nut |
|
| |
|
Teach-in module |
|
 Remove the pendant control.
 Insert the teach-in module.
 Wait at least 5 s.
 Remove the teach-in module.
 Only with pendant control with
teach-in button: Instead of inserting the teach-in module, press and hold the
teach-in button for 5 seconds.
 Only with ABURemote AC with
teach-in: Instead of inserting the teach-in module, press and hold the
“teach-in” direct access button (T with arrow) for 5 seconds.
Inserting the pendant control
|
Control cable |
Bayonet coupling |
|
| |
|
Emergency stop button |
Pendant control |
 Only with teach-in module:
Insert pendant control.
 Only with teach-in module:
Unlock emergency stop button.
● The lower switching point is saved.

