If available: Read the
position of the mains power carrying fork from the planning documents (drawing
“Installation position of mains power carrying fork (MCF)”).
If available: Read the
position of the mains power carrying fork from the planning documents (drawing
“Installation position of mains power carrying fork (MCF)”).
If available: Read the
position of the mains power carrying fork from the planning documents (drawing
“Installation position of mains power carrying fork (MCF)”).
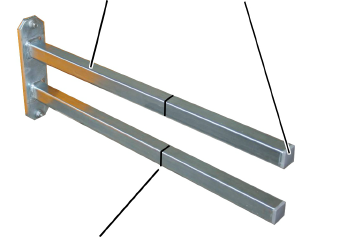
This section only applies if the installation situation allows a mains power carrying fork to be fitted on the end carriage and the enclosed square tubes are suitable for this purpose.
|
Mount |
Ribbed end cap |
|
| |
|
Shorten mount to required length |
|
Remove the ribbed end caps
(2x) from the mount.
Shorten the mount.
The required length is determined by the on-site conditions in the building and the safety clearances from the crane drawing.
Reinsert the ribbed end
caps (2x) into the ends of the mount.
|
| ||
|
| ||
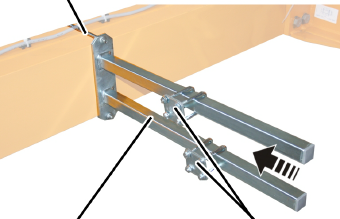
|
Mount |
Pipe clamp | |
 Attach the mount to the end carriage on which
the crane panel is installed.
Attach the mount to the end carriage on which
the crane panel is installed.
Bolt the mount onto the threaded bracket.
|
Threaded bracket |
Tightening torque |
|
M8 |
25 Nm |
|
M10 |
50 Nm |
|
M12 |
75 Nm |
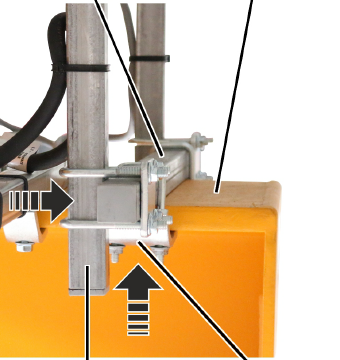
Slide on the two pipe
clamps and secure them.
Remove the ribbed end cap
from the square tube.
Shorten the square tube.
Reinsert the ribbed end
cap into the square tube.
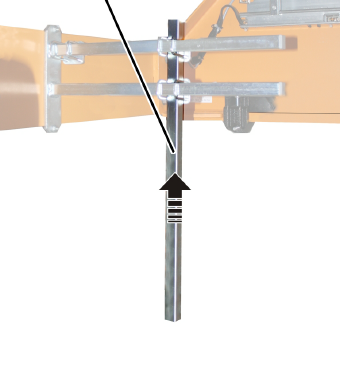
|
Vertical square tube |
|
|
| |
Move the vertical square tube to the required
position on the mount.
The required length is determined by the on-site conditions in the building and the safety clearances from the crane drawing.
Screw the vertical square
tube onto the mount using pipe clamps (2x). Tighten to 15 Nm.
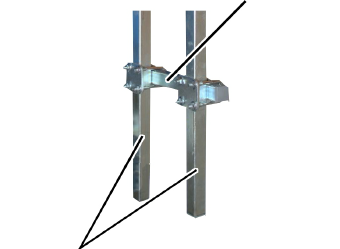
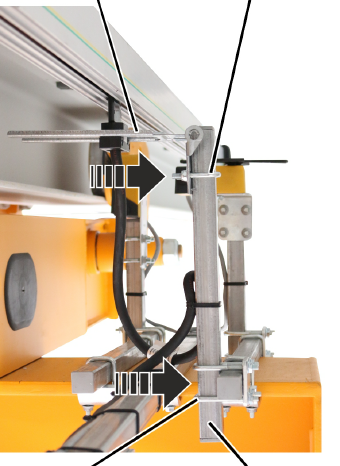
For more than one vertical square tube:
|
|
Horizontal square tube |
|
| |
|
Vertical square tube |
|
Attach the horizontal square tube with two pipe
clamps to the vertical square tubes.
The horizontal square tube can be a single square tube or a part of the current collector on the mains power supply.
Tighten the pipe clamps
(2x). Tighten to 15 Nm
This section only applies if the installation situation allows a mains power carrying fork to be fitted on the main girder and the enclosed square tubes are suitable for this purpose.
In most cases, the mains power carrying fork is installed on the main girder.
|
Horizontal square tube |
Main girder |
|
| |
|
Vertical square tube |
Clamping claw |
Screw the horizontal
square tube onto the main girder using clamping claws. 15 Nm.
Screw the vertical square
tube to the horizontal square tube using pipe clamps. 15 Nm.
This section only applies if the mains power carrying fork has been fitted on the main girder.
|
Carrying fork |
Pipe clamp |
|
| |
|
Pipe clamp |
Vertical square tube |
Screw the carrying fork
with the current collector onto the vertical square tube with pipe clamps.
15 Nm
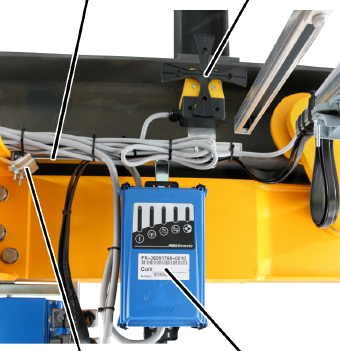
This section only applies if the underslung travelling crane has a ABURemote radio remote control.
|
Square tube |
Cross-type limit switch |
|
| |
|
Clamping claws |
Receiver |
Fasten the square tube to
a suitable point using clamping claws.
Fasten the receiver to the
square tube using pipe clamps (2x).
When doing this, make sure that there is visual contact between receiver and transmitter.
The horn can be attached on the mains power carrying fork or on another square tube for example.
|
Clamping claws |
Cross-type limit switch |
|
| |
|
Horn |
Receiver |
Fasten the horn to a
suitable point on a square tube using a pipe clamp. 15 Nm.